Automatic Watering Systems With a Water Butt
Written on 08/03/2006 at 09:46Update 29/12/06:
Since this article was written Hozelock have manufactured a water butt pump. So if electricity is available then with the use of the hozelock water butt pump you can run a complete watering system as if it was connected to a tap.
One of the most commonly asked questions regarding automatic watering systems in 2005 was whether a watering system could be run from a water butt. These systems are designed to run from an external tap but there are many benefits of running a system from a water butt or reasons why an external tap cannot be used or is simply not available. We promised many times last year that we would run tests on the Hozelock watering system to investigate the possibility of using the system with a water butt and, sorry for the delay, we have finally completed the tests and the results are interesting.
One of the most commonly asked questions regarding automatic watering systems is whether a watering system could be run from a water butt. These systems are designed to run from an external tap but there are many benefits of running a system from a water butt or reasons why an external tap cannot be used or is simply not available. We have promised many times in the past that we would run tests on the Hozelock watering system to investigate the possibility of using the system with a water butt and, sorry for the delay, we have finally completed the tests and the results are interesting.
 We found that it is possible to use a small automatic watering system from a water butt
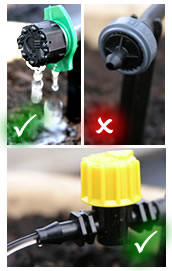
if you stick to certain drippers. The water pressure provided by the water butt is purely derived from the gravity of the water in the butt, due to the low pressure the most effective drippers are the adjustable drippers and the flow control valve.
The flow control valve (shown bottom right) isn't strictly a dripper but as it's adjustable it is ideal for use with low pressure as the valve can be opened right up so that there is little resistance.
The pressure compensating drippers (shown top right) that come with some of the complete watering kits were found to be ineffective as they require higher pressure than that available from the water butt. If you would still like to purchase one of the kits then you would will need to purchase the adjustable drippers separately to replace the pressure compensating drippers provided in the kit.
From the tests we proved that it would be possible to water a number of grow bags for at least a fortnight allowing you to go on holiday and still water your tomato plants, or in the event of a hosepipe ban you could still water a number of pots, grow bags or individual plants. All Hozelock timers have been updated and now work at low pressure so you can set the period of watering and the frequency.
Read on to see a detailed plan of how to set the system up. If you need to run a substantial watering system and don't have access to an external tap but do have access to electricity then you can run a watering system using a water butt pump.
Setting up the Water Butt Watering System
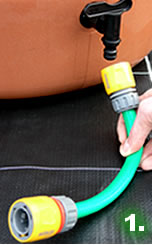 Stage 1
In order to connect the watering system to the water butt we need to look at the outlet of the water butt. The outlet is usually in the form of a tap, in our case we have used a Harcostar tap as they are compatible with Hozelock connectors. If your tap isn't compatible then it should be possible to unscrew the current tap and replace it with the Harcostar tap.
In order to get the water from the butt to the watering system we have taken a small piece of hose and added a Hozelock connector to each end.
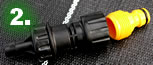 Stage 2
The next step is to connect the pressure regulator to the newly added piece of hose, as the pressure regulator is screw fit then a Hozelock accessory adaptor is require.
 Stage 3
Once this is screwed into the pressure regulator it can be plugged into the Hozelock connector as the end of the small piece of hose. (A pressure regulator is not necessarily needed as the water pressure is already low, but the regulator also contains a small filter to stop foreign bodies entering the watering system and blocking the small micro tube.)
We now have the start of our watering system.
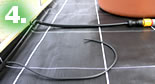 Stage 4
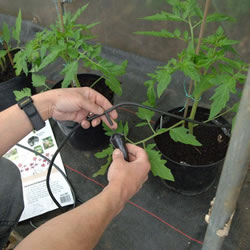
Once we have start of the system we can set up the pipe work of the system. In our case we have run the 25mm supply tube from the water butt to the back of our greenhouse staging and then along the back of the staging. We have secured the supply tube to the back of the staging using wall clips. We have then connected small lengths of the 4mm micro tube to the supply tube in order to get water to the pot that we will later use for the test.
The micro tube is connected to the supply tube using 4mm adaptors.
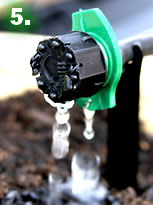 Stage 5
At this stage we are only missing the drippers and we would recommend using either the adjustable drippers or the 4mm flow control valve. In this example we have shown the adjustable dripper attached to the end of our micro tube, in total we used 9 adjustable drippers to water 9 small pots containing newly planted bulbs.
Like This Article? Why not Share or Tweet about it.
POPULAR RELATED PRODUCTS
Customers Also Purchased
- 4.6 out of 5(45 reviews)£89.99RRP £167.99In Stock Now!
- 4.6 out of 5(41 reviews)£64.98RRP £86.99In Stock Now!
- £62.10Quick, there's only 5 left!
- 2.7 out of 5(3 reviews)£44.49RRP £59.99In Stock Now!
- £143.69Quick, there's only 5 left!
- £212.12Quick, there's only 5 left!
- £16.09Quick, there's only 1 left!
- £75.27Quick, there's only 5 left!
- £67.84Quick, there's only 8 left!
- £41.40Quick, there's only 3 left!